Hello everyone!

I’m so excited to share with you this new sign I made!! I have an empty spot on the wall that’s been needing something special and this will be a perfect fit.
Of course, you can follow this tutorial and make your own sign with any phrase you’d like but if you do want to make this one then you can download the free file here – Have Yourself A Merry Little Christmas FREE SVG
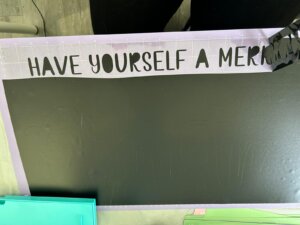
My wonderful niece gifted me with this lovely handmade 12″X36″ inch framed blank sign. It’s actually double-sided so I decided to do this sweet Christmas song line to make the most of this lovely gift. The rest of the year it will have lyrics from one of my favorite Worship songs (Waymaker) on the other side.
It’s a simple project but vinyl can have a mind of it’s own at times so here are some tips to help you out…
TIPS
Tip #1 – Use matte vinyl for signs
Glossy photos, glass and vinyl tend to create a glare so I like to make all my vinyl signs with matte vinyl so it can be seen from all angles in my home. For this one I used LOKLIKs Permanent Matte Black Vinyl.
Tip #2 – Use Vinyl that is easy to weed
Weeding is fun! But not that fun ;). Though this sign was fairly simple to weed, some of my vinyl projects require A LOT of weeding which is another reason I always go to my LOKLIK stash as it looks great and is super easy to weed. This sign took me less than 5 minutes!
Tip #3 – Think about the font
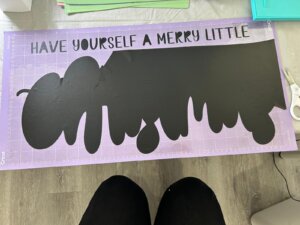
I could have used a different font for Christmas to cut it in 2 sections to make it fill more of the sign, but I really wanted this font and am very happy with some blank space on the sign itself so I sized it to cut at 9 inches high by 23.5 inches wide. The tip here is to keep in mind the size of mat you have, the size of your sign, how you want it to look and how finicky you want to be with piecing it together.
MATERIALS NEEDED
Cutting machine
Wooden sign (or anything you want to use as the backing for your sign)
An SVG file of your choice (If you’d like to use mine then you can download it HERE)
Vinyl ( I used the matte black permanent adhesive vinyl by LOKLiK)
Transfer Tape
Cutting mat
Weeding tools
STEPS
Cut your vinyl to sit within the grid on your mat. Always double check that you have the correct size of vinyl for what you are cutting.
Cut vinyl with your software and Crafter
Remove the mat and vinyl from the machine and leave vinyl on the mat to weed (makes it more stable while weeding)
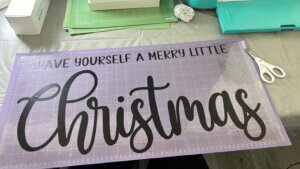
Weed your design

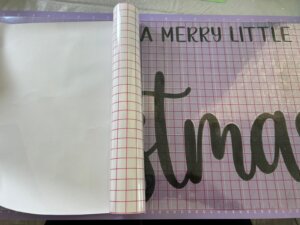
Measure and cut your transfer tape to the same size of your design
Apply transfer tape to design in small sections at a time as you roll the tape off of its backing paper
Use your scraper tool to make the vinyl adhere well to the transfer tape
Peel backing paper off of the transfer tape being careful to not lift your design. It can twist and fold if you are not careful. Use your tool to assist you to keep the vinyl on the tape as you work
Using your guide if you have one ( I used a piece of low stick tape for where I wanted the far right edge of my transfer tape to line up) place the far right or left (depending on which is your dominant hand and which hand you will use to press the tape onto the sign) edge of the transfer tape onto your sign and slowly attach the design to your board smoothing it down as you work across to the opposite side you started with
use your scraper tool to ensure the vinyl is sticking well to your sign, and carefully peel the transfer tape back and off across the sign
use your hands or cover design with a piece of paper and scrape across the vinyl to make sure the final result is well adhered
Find a place for your newest decor!!